How To Become More Self-Sufficient Without Starting a Full-Blown Farm…
Want to start preserving your harvest, making your own soap, or building a backyard root cellar — but not sure where to begin? “Homesteading Advice” gives you instant lifetime access to 35+ practical homesteading books on food preservation, veggie gardening, DIY natural cleaning products (save over $250 per year with this skill alone), brewing, off-grid energy, and a whole lot more…
Click Here To Check It Out Now!
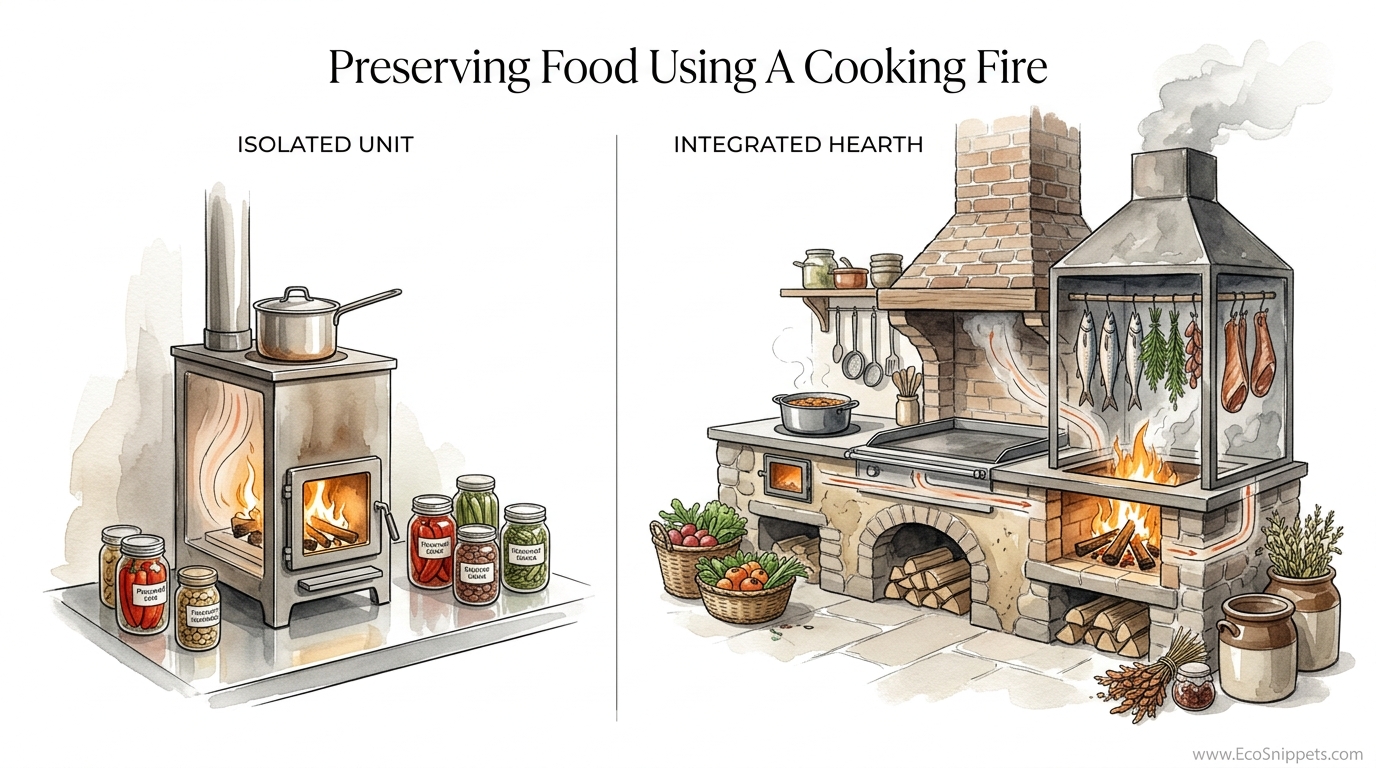
Don’t buy a separate machine to dry your food; use the ‘waste’ energy already rising from your daily cooking fire. On an integrated homestead, everything has two jobs. Why run an electric dehydrator in one room while you cook dinner in another? The ancient hearth system used the rising heat and antimicrobial smoke from the daily cooking fire to preserve the winter larder. One fire, two jobs, zero extra cost.
Modern convenience has taught us to isolate every task into its own specialized plastic box. We have a stove for cooking, a heater for warmth, and a dehydrator for preservation. This fragmentation of the household creates waste and increases our dependency on external grids. Returning to the integrated hearth means looking at your kitchen fire as a multi-functional engine of self-reliance.
Using a cooking fire for food preservation is a skill that blends physics, chemistry, and patience. It requires you to understand the behavior of heat and the nature of wood. This guide will walk you through the logic of the hearth and how you can reclaim this ancestral wisdom for your own homestead.
Preserving Food Using A Cooking Fire
Preserving food with a cooking fire is the practice of positioning fresh harvests within the path of rising warm air and wood smoke. This method is as old as fire itself and has been utilized by virtually every culture that endured long winters or rainy seasons. Instead of relying on a mechanical fan and a heating element, this system uses natural convection to pull moisture out of meat, fish, fruits, and vegetables.
In the Alpine regions of Europe, families historically used “smoke lofts” or “curing attics” located directly above the central kitchen. In China, the tradition of la rou involves hanging pork in smoke-blackened kitchens during the dry winter months. North American pioneers often had racks suspended from the ceiling beams to keep herbs and salted meats in the path of the hearth’s gentle warmth.
The fundamental goal is to reduce the “water activity” of the food. Bacteria and mold need moisture to thrive and multiply. By slowly removing this water, you create an environment where spoilage organisms cannot survive. The addition of wood smoke provides a secondary layer of protection by depositing antimicrobial compounds on the surface of the food.
This isn’t just about jerky or smoked salmon. It is a holistic approach to managing the home’s energy. Every time you boil a kettle for tea or simmer a stew for three hours, you are generating “waste” heat. In an integrated system, that heat is captured and channeled to dry garlic, onions, peppers, or strips of venison.
The Mechanics of Hearth Preservation
The primary mechanism at work here is convection. As air is heated by the fire, it becomes less dense and rises. This creates a constant, gentle upward draft. If you place a rack or a pole above the fire, this moving air passes over the food, carrying away moisture molecules.
For effective drying, the air must be warm but not hot enough to cook the food. If the temperature is too high, you risk “case hardening.” This occurs when the outside of the meat or fruit dries so quickly that it forms a hard, impermeable crust. This crust traps moisture inside, leading to internal rot even if the outside looks perfectly preserved.
Airflow is just as important as heat. If the air is stagnant, the moisture stripped from the food will linger around it, creating a humid microclimate that encourages mold. A well-designed hearth setup uses the natural draw of a chimney or a vent to ensure the air is always moving. This constant exchange of air is what makes the fire more effective than a simple oven.
Smoke adds a chemical dimension to the physical process of drying. Wood smoke contains hundreds of compounds, including phenols and organic acids. These act as antioxidants that prevent fats from going rancid and as antimicrobials that kill surface bacteria. When you use a cooking fire, you are applying a microscopic “shrink wrap” of preservative chemicals to every piece of food.
Selecting the Right Fuel
The quality of your preserved food depends entirely on the wood you put in your fire. Not all wood is created equal for the purposes of preservation. You must choose hardwoods that are seasoned, clean, and free from resins or toxins.
Hardwoods like oak, hickory, maple, and beech are the gold standard for hearth drying. They burn steadily and produce a “clean” smoke that is high in preservative phenols. Fruitwoods such as apple, cherry, and plum are also excellent, offering a sweeter aroma that pairs well with pork and poultry.
Avoid softwoods and resinous evergreens like pine, fir, or spruce. These woods contain high levels of terpenes and resins that produce a heavy, sooty smoke. This smoke will leave a bitter, medicinal taste on your food and can coat your drying racks in a sticky, flammable layer of creosote. In extreme cases, the resins in these woods can even be mildly toxic when concentrated through the drying process.
Ensure your wood is properly seasoned, meaning it has a moisture content of less than 20 percent. Green wood produces excessive steam and “dirty” smoke, which can introduce too much moisture into the drying area. A clean, hot bed of coals with a few small pieces of hardwood added for smoke is the ideal setup for a dual-purpose cooking and drying fire.
Benefits of the Integrated Hearth
The most immediate benefit is energy efficiency. You are using the fuel you were already going to burn to prepare your meals. On a homestead where wood must be chopped, hauled, and stacked by hand, every BTU counts. Using one fire to cook, heat the home, and preserve the harvest is the ultimate expression of homesteading economy.
Flavor is another undeniable advantage. Modern electric dehydrators produce a sterile, neutral-tasting product. Food dried over a hearth carries the subtle, complex nuances of the wood smoke. This adds a depth of flavor to soups, stews, and snacks that cannot be replicated with a machine.
Hearth preservation also offers a level of security. If the power grid fails, an electric dehydrator is a useless plastic box. The hearth continues to function as long as you have wood. This makes it a critical tool for long-term self-reliance and resilience against external disruptions.
Finally, the process of hearth drying keeps the food in the center of the home where it can be monitored. You are naturally inclined to check the progress of your drying racks while you are in the kitchen cooking. This regular observation allows you to rotate pieces, adjust the fire, and ensure everything is progressing safely without having to make a special trip to a separate “utility” room.
Common Pitfalls and Challenges
One of the most frequent mistakes is placing the food too close to the flames. Intense radiant heat will cook the exterior and leave the interior raw. Always maintain a safe distance—usually at least 60 to 90 centimeters (2 to 3 feet) above the flame, depending on the intensity of the fire.
Another challenge is managing the variability of the fire. Unlike a thermostat-controlled dehydrator, a wood fire fluctuates in temperature. You must learn to read the fire and the air. If the room feels too damp, you may need a small, bright fire to drive out humidity. If it is too hot, you may need to move your racks higher.
Contamination from ash and soot can also be an issue. If your fire is popping or if you are using poor-quality wood, ash can settle on your food. This is largely a cosmetic issue but can affect flavor. Using a fine mesh screen or a “smoke shroud” made of light linen can help protect the food while still allowing air and smoke to pass through.
Creosote buildup in the chimney or on drying structures is a serious fire hazard. Because you are intentionally keeping the air warm and smoky, you must be diligent about cleaning your racks and the surrounding area. Any surface that feels “tacky” or smells like old tar needs to be scrubbed to prevent a grease fire.
Limitations of Fire-Based Preservation
This method is not ideal for every type of food. Delicate greens, such as spinach or kale, can easily be “over-smoked” or charred by the rising heat. These are often better suited for quick solar drying or very low-temperature electric drying where the flavor remains bright.
High-fat meats require extra caution. If the temperature rises too high, the fat will begin to render and drip into the fire. This not only creates a mess but can cause flare-ups and “off” flavors from the burning fat. Fatty meats like bacon or certain types of fish should be cold-smoked at temperatures below 38°C (100°F) for safety.
Environmental humidity plays a massive role. In a very humid or rainy climate, a cooking fire may struggle to pull enough moisture out of the food to prevent mold. In these conditions, you must be prepared to keep a fire going nearly 24 hours a day to maintain a dry environment, which may not be practical for everyone.
Lastly, there is the issue of “smoke load.” While the chemicals in smoke are preservative, they also contain polycyclic aromatic hydrocarbons (PAHs), which some health studies link to risks if consumed in extreme quantities. Using a “thin blue smoke” rather than thick, billowing white smoke helps minimize this while still providing the necessary antimicrobial benefits.
Integrated Hearth vs. Isolated Unit
When deciding between the hearth and a standalone dehydrator, it helps to look at the trade-offs in terms of labor, cost, and output.
| Factor | Integrated Hearth | Isolated Electric Unit |
|---|---|---|
| Energy Cost | Zero (Uses waste heat) | Moderate (Electric bill) |
| Initial Investment | Low (Simple racks/hooks) | Moderate to High ($100-$500+) |
| Labor Required | High (Fire management) | Low (Set and forget) |
| Precision | Variable (Depends on skill) | High (Digital thermostat) |
| Flavor Profile | Complex and Smoky | Neutral |
The integrated hearth is clearly the winner for the self-reliant homesteader who values efficiency and flavor over convenience. However, the electric unit serves as a useful backup for those who cannot tend a fire throughout the day or who need absolute precision for delicate items.
Practical Tips for Beginners
Start with something simple like herbs or peppers. These have a high surface-area-to-volume ratio and dry quickly. Bundle them with twine and hang them from a “lug pole” or a rack situated at the edge of the hearth’s heat zone. This allows you to observe how the air moves and how the smoke interacts with the food without risking an expensive harvest.
Always brine or salt-cure meats before they go over the fire. Salt is a powerful “hurdle” in food preservation. It draws out moisture from the inside of the meat and makes the surface inhospitable to bacteria before the drying process is even complete. A 2% to 3% salt concentration by weight is a standard starting point for many preservation recipes.
Allow the food to air-dry for a few hours before putting it over the fire. This helps form a “pellicle,” which is a slightly tacky skin on the surface of the meat or fish. Smoke particles adhere much better to a pellicle than to a wet surface. This ensures a more even distribution of the preservative smoke compounds.
Use a thermometer to check the temperature at the rack level. For long-term drying (cold smoking), you want the air around the food to stay between 25°C and 35°C (77°F to 95°F). If it goes above 40°C (104°F), you are starting to cook the proteins and melt the fats, which changes the shelf life and texture.
Advanced Hearth Techniques
Once you master the basic rack, consider building a “smoke shroud” or a temporary cabinet around your drying area. This can be as simple as a heavy canvas cloth that hangs down to trap more smoke around the food. By controlling the “draw” of this shroud, you can increase the smoke concentration without needing a larger fire.
Learn to use “indirect heat.” If you have a large hearth, you can build your cooking fire on one side and place your drying racks on the other. This uses the horizontal movement of the air before it enters the chimney. It is a much gentler way to dry food and significantly reduces the risk of case hardening or dripping fat.
Experiment with different wood blends. Just as a chef uses spices, a hearth master uses wood. Mixing a bit of juniper or rosemary branches into an oak fire can provide additional antimicrobial oils and a unique aroma. In some traditions, dried fruit peels or even corn cobs are used to create specific types of smoke for certain meats.
Seasonal timing is also an advanced consideration. The best time for major hearth preservation is in the late autumn or early winter when the ambient air is cool and dry. The “delta” between the outside air and the hearth air creates a stronger draw in the chimney, resulting in better airflow and more efficient drying.
Scenario: A Typical Fall Harvest Day
Imagine it is a crisp November morning. You have just finished butchering a small surplus of venison and harvesting the last of the garden’s chili peppers. Instead of dragging out three different appliances, you light the central hearth fire.
For breakfast, you hang a cast-iron kettle over the flames to boil. While the water heats, you string the peppers and hang them high up in the “warm zone” near the ceiling. The venison, which was sliced and salted the night before, is laid out on a wooden rack positioned about 1 meter (3 feet) above the hearth floor.
By lunchtime, the stew is simmering in a Dutch oven on a trivet at the edge of the coals. Every time you stir the pot, you give the venison rack a quick rotation. The rising steam from the stew doesn’t hurt; the upward draft of the fire is strong enough to carry it straight out the chimney, taking the meat’s moisture with it.
By evening, the peppers are already starting to feel leathery, and the venison has taken on a beautiful mahogany sheen from the hickory smoke. The house is warm, the dinner is cooked, and the winter larder is growing—all from the energy of a single fire that would have been burning anyway.
Final Thoughts
The integrated hearth is more than just a way to save money on electricity. It is a return to a lifestyle where the home functions as a single, coherent system. When you use your cooking fire to dry your food, you are participating in a cycle of efficiency that has sustained humanity for millennia. It encourages a deeper connection to your fuel, your food, and the very air you breathe.
Reclaiming this skill takes time and a willingness to fail. You might over-smoke a batch of fish or find a spot of mold on a pepper. These are not failures but lessons in the school of the hearth. Each fire you build teaches you more about the balance of heat and airflow than any instruction manual ever could.
As you move forward, look for ways to give every flame a second job. Whether you are drying laundry, heating water, or preserving meat, remember that the “waste” heat rising from your stove is a resource. Harness it, and you will find yourself one step closer to the true independence of the integrated homestead.
