How To Become More Self-Sufficient Without Starting a Full-Blown Farm…
Want to start preserving your harvest, making your own soap, or building a backyard root cellar — but not sure where to begin? “Homesteading Advice” gives you instant lifetime access to 35+ practical homesteading books on food preservation, veggie gardening, DIY natural cleaning products (save over $250 per year with this skill alone), brewing, off-grid energy, and a whole lot more…
Click Here To Check It Out Now!
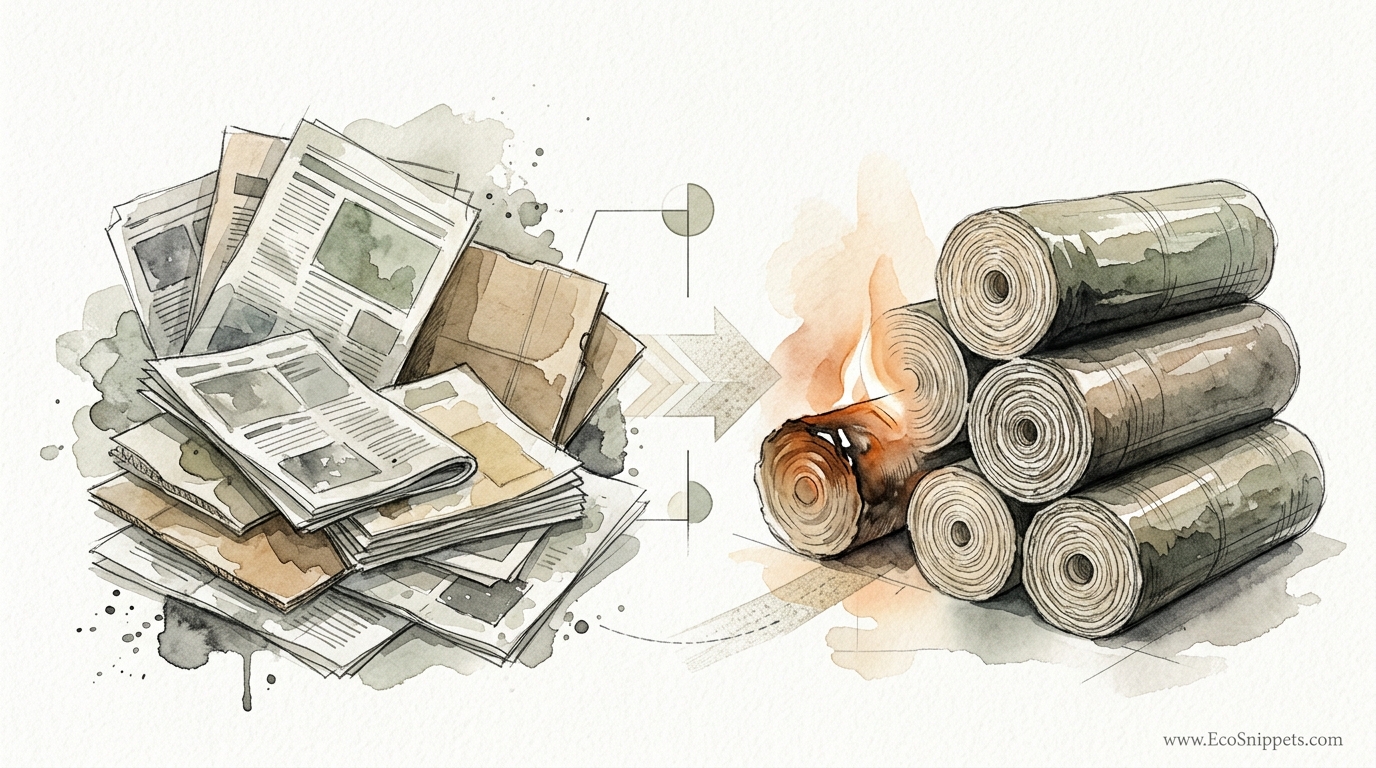
You are literally throwing away a winter’s worth of free heating fuel every time you empty your mailbox. Stop paying for ‘convenience logs’ that smell like chemicals. Learn how to turn your unwanted junk mail and delivery boxes into high-output, slow-burning logs that cost absolutely nothing but a little bit of water and a afternoon of pressing.
Every home in the modern world is a silent factory of fuel. We are surrounded by cellulose in the form of discarded envelopes, shipping containers, and local newspapers. Most people view this as a nuisance to be dragged to the curb, but with a few simple tools and a bit of traditional resourcefulness, you can transform this waste into a reliable heat source.
Generating your own heat provides a sense of security that a monthly utility bill never can. When you take control of your fuel supply, you are no longer at the mercy of fluctuating propane prices or the availability of seasoned hardwood. You are simply practicing the ancient art of thrift and self-reliance.
Making compressed paper logs is not about just rolling up a newspaper and tossing it into the hearth. That method leads to fast, flare-up burns that produce more smoke than heat. True paper logs are pulped and compressed to a density that rivals seasoned oak, providing a steady, coal-like glow that lasts for hours.
DIY Compressed Paper Fire Logs
Compressed paper fire logs are high-density fuel bricks created by breaking down paper fibers into a pulp and then squeezing out the moisture under high pressure. This process removes the air pockets that normally cause paper to burn in seconds. Once dried, these “bricks” or “logs” behave much like traditional cordwood in a wood stove or fireplace.
The concept relies on the natural binding properties of cellulose. When paper is soaked in water, the fibers loosen and expand. As you apply pressure to the pulp, these fibers interlock and knit together. When the water evaporates, the resulting log is a solid mass of fuel that burns from the outside in, much like a solid piece of timber.
In real-world terms, this is the ultimate recycling loop. Instead of sending shipping boxes to a facility to be processed into new cardboard, you are converting that energy directly into warmth for your home. It is a practice that was common during times of resource scarcity and is seeing a resurgence among those who value independent living and low-impact heating.
These logs can be used in almost any environment where you would burn wood. They are excellent for wood stoves, open fireplaces, and outdoor fire pits. While they produce slightly more ash than wood, they often burn cleaner with fewer sparks and zero popping, making them a predictable and safe fuel source for the homestead.
How It Works: The Step-by-Step Process
The transition from a pile of junk mail to a stack of fuel requires a clear, systematic approach. You cannot rush the physics of fiber binding and evaporation. Follow these steps to ensure your logs are dense, dry, and ready for the hearth.
1. Collection and Material Selection
Gather your materials over several weeks. Ideal candidates include newsprint, matte junk mail, and non-glossy cardboard. Avoid heavy plastics, windowed envelopes, and glossy magazine pages, as these contain coatings that do not pulp well and may release unpleasant fumes. Remove any staples or tape before processing.
2. The Shredding Phase
While you can pulp whole sheets, the process is significantly faster if the paper is shredded. A cross-cut shredder is ideal because it creates small, uniform pieces that absorb water quickly. If you are using heavy cardboard, tear it into pieces no larger than 2 inches (5 cm) by 2 inches (5 cm) to ensure the core of the material gets fully saturated.
3. The Deep Soak
Place your shredded material into a large vessel, such as a 5-gallon (19-liter) bucket. Fill the container with water until the paper is completely submerged. Use warm or hot water to speed up the breakdown of the fibers. Let the mixture sit for at least 24 to 48 hours. The goal is to reach a consistency where the paper feels slimy and falls apart when rubbed between your fingers.
4. Pulping and Mixing
Once the paper is soft, you need to turn it into a consistent mash. You can do this by hand with a heavy stick, but a power drill with a paint-mixing attachment is much more efficient. Mix until no large chunks remain. At this stage, the “slurry” should look like thick oatmeal or wet cement.
5. Pressing the Logs
Load the pulp into your log press. If you are using a commercial briquette maker, fill the chamber to the top. Use a slow, steady pressure to squeeze the water out. Most of the water should exit through the drainage holes in the first thirty seconds. Continue pressing until you can no longer force water from the device. The more water you remove now, the faster the log will dry and the denser it will be.
6. The Drying and Seasoning Phase
Remove the compressed log from the press and place it in a well-ventilated area. A drying rack made of wire mesh is ideal because it allows air to circulate around all sides of the log. Depending on the humidity and temperature, drying can take anywhere from two weeks to several months. A properly seasoned paper log should feel lightweight and sound hollow when tapped against another log.
Benefits and Advantages of Paper Logs
Choosing to manufacture your own fuel offers several practical advantages that go beyond the obvious financial savings. It is a method that transforms a domestic waste stream into a valuable asset.
- Zero Monetary Cost: Your fuel supply is delivered to your door every day for free. Aside from the initial cost of a press or the time spent building one, the heating energy is entirely subsidised by the waste of the modern economy.
- High Energy Density: When properly compressed, paper logs can reach a heat output of approximately 7,900 BTUs per pound (18.4 MJ/kg). This is comparable to many hardwoods, providing a long-lasting heat source that requires fewer trips to the woodpile.
- Lower Emissions: Research into biomass burning suggests that compressed paper logs can produce up to 50% less smoke and fewer particulate emissions than unseasoned or poor-quality firewood. This results in a cleaner chimney and a smaller environmental footprint.
- Predictable Burn: Because these logs are uniform in size and density, they burn with a consistent intensity. This makes it easier to regulate the temperature of your wood stove compared to using irregular, knotty chunks of cordwood.
- Waste Management: A single household can easily produce several hundred pounds of paper and cardboard waste per year. Converting this into fuel reduces the burden on local recycling systems and ensures the energy contained in the cellulose is used effectively.
Challenges and Common Mistakes
Manufacturing your own fuel is a skill that requires a learning curve. Many beginners experience frustration when their first batch of logs fails to perform. Most of these issues can be avoided with a bit of foresight.
The “Mold Trap” is the most frequent failure. If logs are stored in a damp area or stacked too tightly before they are fully dry, mold will begin to grow in the moist core. This not only ruins the fuel but can also release spores into your home when burned. Always ensure a “criss-cross” stacking pattern during the drying phase to maximize airflow.
Insufficient Compression is another common pitfall. Using only hand pressure without a mechanical advantage (like a lever or screw press) often leaves too much air and water inside the log. These “spongy” logs will smolder and produce excessive smoke rather than a clean flame. If your logs feel soft or flexible after drying, you need to increase the pressure during the manufacturing stage.
Incomplete Pulping leads to logs that fall apart. If you leave large sheets of paper intact, they act as layers that can separate as the log dries. This structural weakness causes the log to “delaminate” in the fire, causing it to burn too quickly as the surface area suddenly increases. Take the time to ensure your slurry is a uniform mash before pressing.
Limitations and Practical Constraints
While paper logs are a fantastic resource, they are not a perfect replacement for traditional firewood in every scenario. Understanding these boundaries will help you integrate them into your heating strategy more effectively.
One primary limitation is the Ash Content. Paper contains fillers like clay and various minerals used during the manufacturing process. These do not burn away. Consequently, burning paper logs produces significantly more ash than burning oak or maple. You will find yourself emptying the ash pan of your stove more frequently—often twice as often as with traditional wood.
The Time Investment is another factor to consider. Unlike cordwood, which can be delivered and stacked in an afternoon, paper logs require a multi-day process of soaking, pulping, and pressing. It is a task best suited for those who enjoy the rhythm of domestic production and have the space to allow hundreds of bricks to dry over the summer months.
Environmental constraints also play a role. In very humid climates, drying paper logs naturally can be extremely difficult. If the ambient moisture remains high, the logs may never reach the 15-20% moisture content required for an efficient burn. In these regions, a solar kiln or an indoor drying rack near a heat source may be necessary.
Comparison of Fuel Sources
To understand where paper logs fit into your heating plan, it is helpful to compare them to traditional cordwood and commercial manufactured logs. Each has its place depending on your budget and storage capacity.
| Feature | DIY Paper Logs | Seasoned Hardwood | Commercial Wax Logs |
|---|---|---|---|
| Cost per Unit | Free / Near Zero | Moderate to High | High |
| Heat Output (BTU/lb) | ~7,500 – 8,000 | ~6,500 – 8,500 | ~12,000+ (wax assisted) |
| Preparation Time | High (Pulping/Pressing) | Moderate (Splitting) | None (Ready to use) |
| Ash Production | Very High | Low | Minimal |
| Storage Space | Moderate (Compact bricks) | High (Bulky stacks) | Very Low |
Practical Tips and Best Practices
To get the most out of your “mailbox fuel,” consider these field-tested adjustments to the standard process. Small changes in your technique can lead to a significantly better burning experience.
- The 70/30 Rule: For the best burn, don’t use 100% paper. Mix in about 30% sawdust or wood shavings if you have access to them. The wood particles provide structural integrity and increase the BTU output of the final log.
- Use a Binder: If your logs are brittle, add a small amount of cornstarch or cheap flour to the pulping water. This acts as a natural glue that helps the cellulose fibers bond, resulting in a much tougher brick that won’t crumble during transport.
- The Central Airway: When pressing or rolling logs, try to leave a small hole through the center (using a dowel or a specialized press). This “chimney effect” allows air to reach the center of the log as it burns, preventing the smoldering that often occurs with solid, dense blocks.
- Batch Processing: Don’t make one log at a time. Set up a system with multiple buckets soaking at once and a dedicated pressing day. This efficiency makes the “cost” of your labor much lower per log.
- Start with Wood: Always establish a good bed of coals with regular firewood before adding your paper logs. They perform best when they can absorb heat from an existing fire, which helps them reach their ignition temperature without excessive smoke.
Advanced Considerations
For those looking to scale up their production or optimize their fuel for extreme cold, there are several advanced techniques to explore. These methods move beyond simple hand pressing and into the realm of small-scale fuel manufacturing.
Hydraulic Pressing: While a manual lever press is sufficient for most, a hydraulic shop press can apply several tons of force. This level of compression removes significantly more water and creates a log so dense it can actually sink in water. These “super-logs” burn much longer and are almost impervious to moisture once dried.
Solar Kiln Drying: To solve the problem of long drying times, you can build a simple solar kiln using a wooden frame and clear plastic sheeting. By trapping the sun’s heat and providing a small vent for moisture to escape, you can reduce drying time from months to mere days, even in less-than-ideal weather.
Additives for Aroma and Heat: Experimenting with additives can improve the ambiance of your fire. Dried orange peels, coffee grounds, or even small pine cones can be mixed into the pulp. These not only provide a pleasant scent but also contain natural oils that can help the log ignite more easily and burn with a brighter flame.
Example Scenario: A Season of Self-Reliance
Imagine a typical suburban home that receives several pounds of mail and packaging every week. Over the course of a year, this family collects roughly 400 pounds (181 kg) of usable paper waste. By dedicating one Saturday a month to pulping and pressing, they can produce approximately 200 high-density logs.
During a cold snap, they use two paper logs per evening to supplement their main wood stove fire. These logs extend the burn time of their expensive hardwood by several hours every night. Over the winter, they find they have saved nearly a quarter-cord of wood—a savings of approximately $100 (£80) or more, depending on local firewood prices.
More importantly, during a power outage or a disruption in fuel delivery, this family has a secondary stack of fuel sitting in their garage. They are not worried about the “convenience logs” at the store being sold out. They have effectively turned their “waste” into a survival asset through a few hours of honest labor.
Final Thoughts
Turning junk mail into fire logs is more than just a clever recycling trick. It is a return to a mindset of total resource utilization. In an age of disposable products and “just-in-time” delivery, there is a profound satisfaction in looking at a pile of waste and seeing a warm hearth instead. It is a practice that rewards patience, grit, and a keen eye for the value hidden in the mundane.
As you begin your journey into homemade fuel, remember that the best results come from experimentation. Your local paper types, your specific climate, and your unique stove will all dictate the “perfect” recipe for your logs. Don’t be discouraged by a few crumbly bricks in the beginning. Every failure is simply a lesson in the mechanics of heat and fiber.
Once you sit by a fire fueled by the very items that used to clutter your counters and fill your bins, you will never look at a cardboard box the same way again. You have mastered a small piece of your own environment, proving that self-reliance is not about having everything, but about making the most of what you already have.
